A green screen does not fail in the edit. It fails on the stage, an hour before anyone presses record, and the editor inherits the problem. We shoot on green almost every week for our own series, Hot Cheap Comedy, and for client commercials, and nearly every bad key we have ever had to rescue came from one of the same handful of mistakes. This guide covers the practices that prevent them, in the order you meet them on a shoot day, with a diagram for each.
At a glance
- Two lighting jobs. The screen gets flat, even light; the person in front of it gets shaped light.
- Distance fixes most spill. Six feet for a seated interview, eight to ten for a full-body shot.
- Protect the edge in camera. A fast enough shutter, low ISO, locked settings, and sharpening off.
- Check the key on set. A rough key on a monitor before the first take catches problems while they can still be fixed.
1. Light the screen and the subject as two separate jobs
This is the rule everything else hangs on. The screen needs flat, even light so it reads as one color. The person in front of it needs shaped light so they look good and match the scene they will be placed in. Those are different goals, and one set of lights cannot serve both.
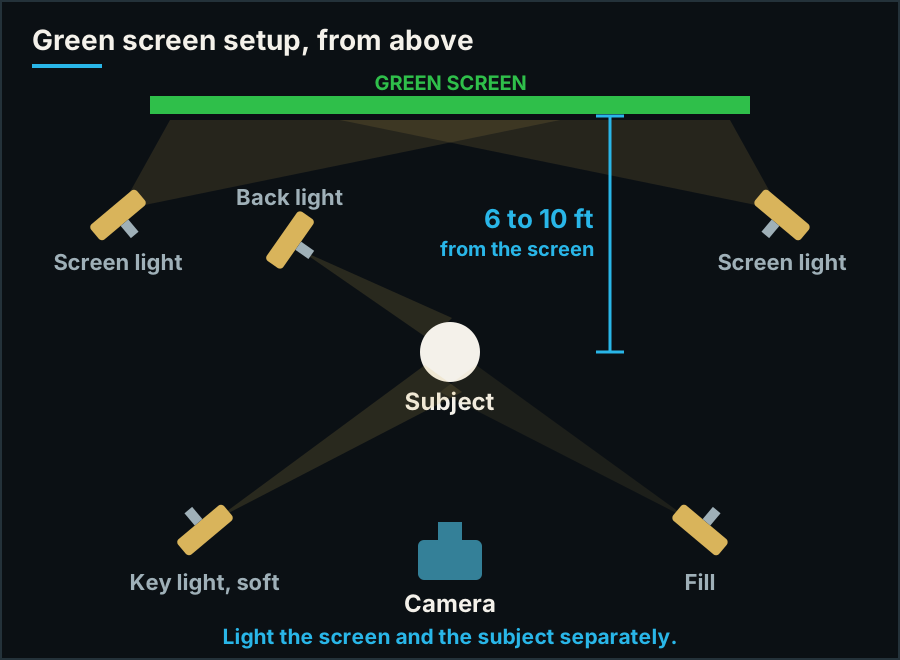
A standard green screen layout seen from above. The screen has its own lights. So does the subject.
- Screen lights: two soft sources, one on each side, set back far enough that their light spreads evenly. Hot spots and dark corners become patchy transparency in the key.
- Light the screen first, with the subject's lights off. Get the screen even on its own. Then turn the screen lights off, light the subject, and only then bring both up together. If you light everything at once you cannot tell which light is causing which problem.
- Check it on a monitor, not by eye. Your eyes even out brightness differences automatically. A waveform monitor or a false color view shows the screen as it really is. You are looking for a flat line.
2. Get the screen brightness right
Brighter is not better. A screen that is too dark gives the software a noisy, muddy green to work with. A screen that is too bright throws more green back onto your subject and pushes the color toward white, which is harder to separate, not easier.
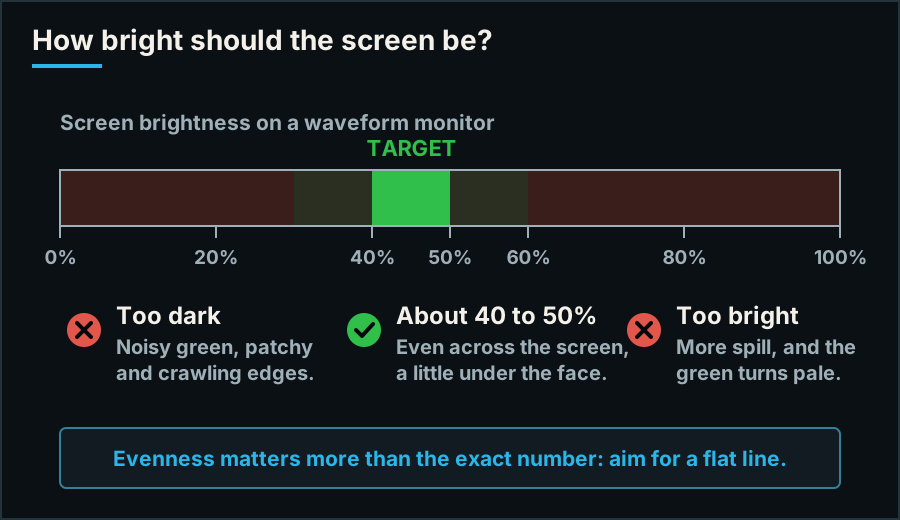
A commonly used target is a screen sitting around 40 to 50 percent on a waveform, a little under the exposure of the subject's face. Treat it as a starting point and check it against your own camera.
The exact figure matters less than consistency. A screen that reads the same from corner to corner keys with one setting. A screen that drifts from bright in the middle to dim at the edges needs several, and that is where an hour of editing turns into a day.
3. Distance is the cheapest fix there is
Most spill and most shadows are solved by moving the subject forward. At six feet from the screen a seated interview is usually safe. For a full-body shot, eight to ten feet is a better starting point, because the floor and the lower part of the screen are both bouncing green upward.
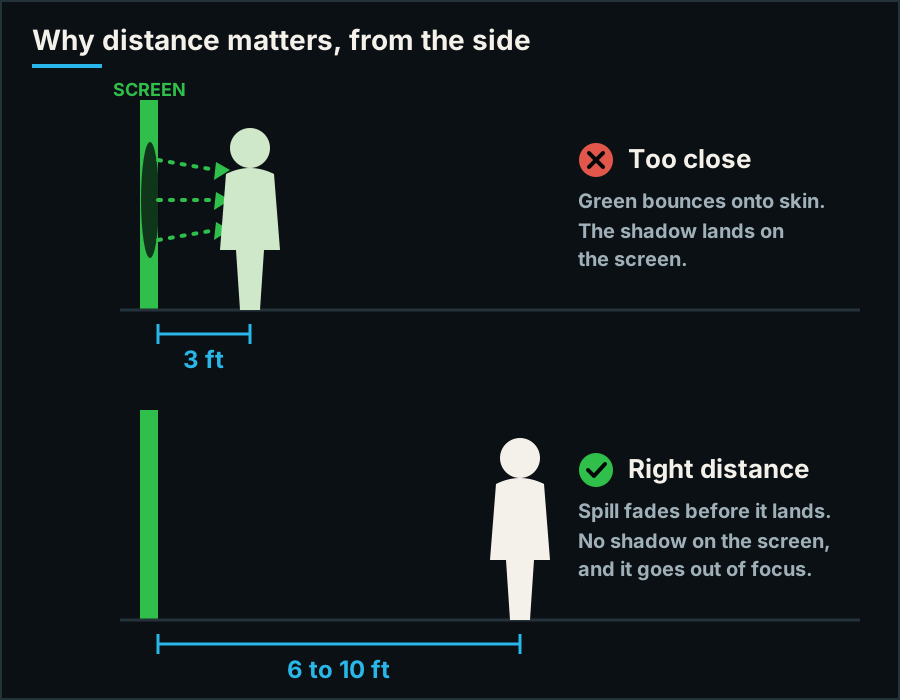
The same screen and the same person. Only the distance changed.
Distance also lets the screen fall slightly out of focus, which hides wrinkles and seams. This is the reason a real studio matters for this work, and it is why most green screen attempts in an office or a spare room struggle. You need room behind the subject, and then the same again between the subject and the camera. When we built our own studio, a clear floor span with no posts was the first requirement.
4. Control the spill before it reaches the edit
Spill is green light reflected off the screen onto your subject. It shows up as a green rim on shoulders, hair, and anything shiny. Software can suppress it, and we run a spill-suppression pass on everything, but suppression always costs a little color accuracy. Less spill on set means a more natural result.
- Add a back light. A light behind and above the subject, neutral or slightly warm, puts a clean edge on hair and shoulders and overpowers the green contamination there.
- Flag what you do not need. Any part of the screen that is outside your frame is only adding green to the room. Cover it with black fabric.
- Watch the floor. A green floor lights the subject from below. If the feet are not in the shot, put something dark and matte under the performer.
- Mind the ceiling and walls. In a small room with pale walls, the green bounces off everything. Dark drapes on the side walls make a bigger difference than most people expect.
5. Wardrobe, hair, and props
Send wardrobe notes before the shoot day. It is a two-line email that saves an hour.
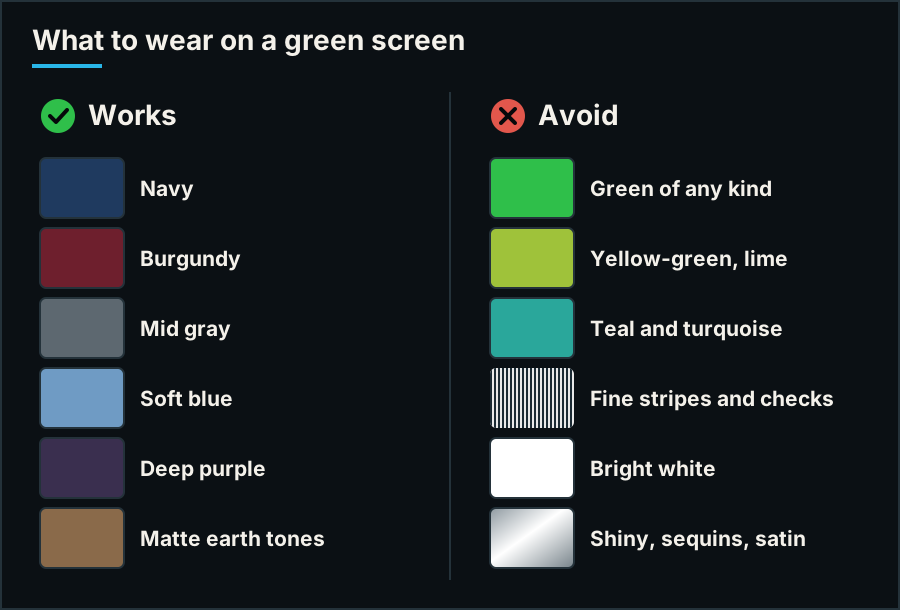
Save this one and send it to whoever is going on camera.
- No green, and be careful with yellow-greens and teals that sit close to it. Whatever matches the screen becomes a hole.
- Avoid fine patterns. Tight stripes, small checks, and herringbone shimmer on camera, and they make the key's edges unstable.
- Be careful with white and with shiny things. Bright white fabric, glasses, jewelry, watches, and glossy props all pick up green reflections. Matte and mid-toned is the safe choice.
- Glasses: tilt them down a few degrees or raise the lights, so the lenses reflect the floor instead of the screen.
- Hair is the hardest edge. Flyaway hair is semi-transparent, and that is where a key looks fake first. The back light helps. So does a little product to keep stray strands down.
- Bring a second outfit. It is the cheapest insurance on the call sheet.
6. Camera settings that protect the key
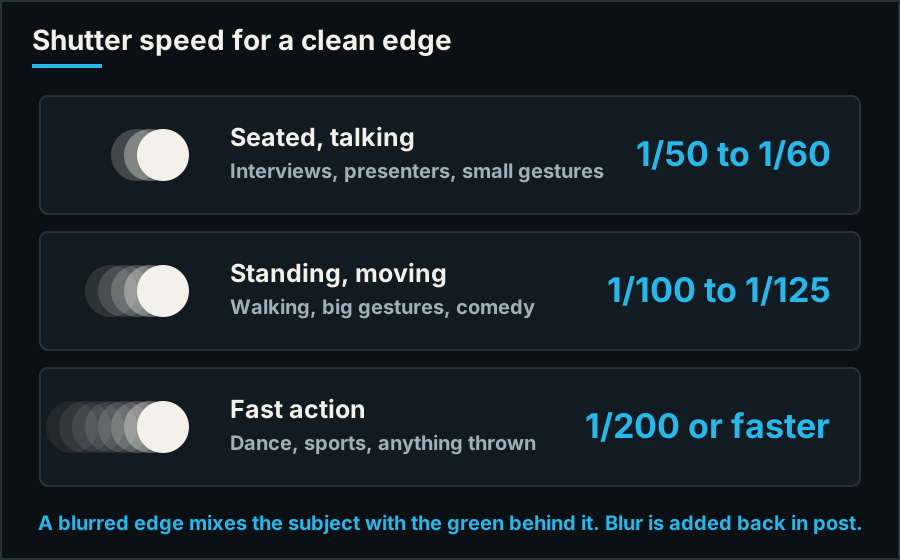
Match the shutter to the movement. Natural-looking motion blur can be added back after the key.
- Keep motion sharp. Motion blur mixes the subject's edge with the green behind it, and a blurred edge cannot be keyed cleanly. Comedy is a good example: our performers gesture, lunge, and fall, so we shoot faster than we would for an interview.
- Record the best color your camera allows. Heavily compressed footage throws away color detail to save space, and color detail is exactly what a keyer uses to find the edge. Higher bitrates and 10-bit recording make a visible difference.
- Keep the ISO low. Grain in the green area turns into crawling noise at the edge of the key. More light on the stage is better than more gain in the camera.
- Lock everything. Auto exposure and auto white balance shift during a take, and then the screen is a different green from one second to the next.
- Turn off in-camera sharpening. It draws a thin bright outline around the subject, and that outline survives the key as a halo.
7. Decide the background before you light
The most common reason a composite looks wrong has nothing to do with the key. The subject is lit from the left and the background's sun is on the right. The background is a wide-angle room and the subject was shot on a long lens. The eye notices immediately, even when the viewer cannot say why.
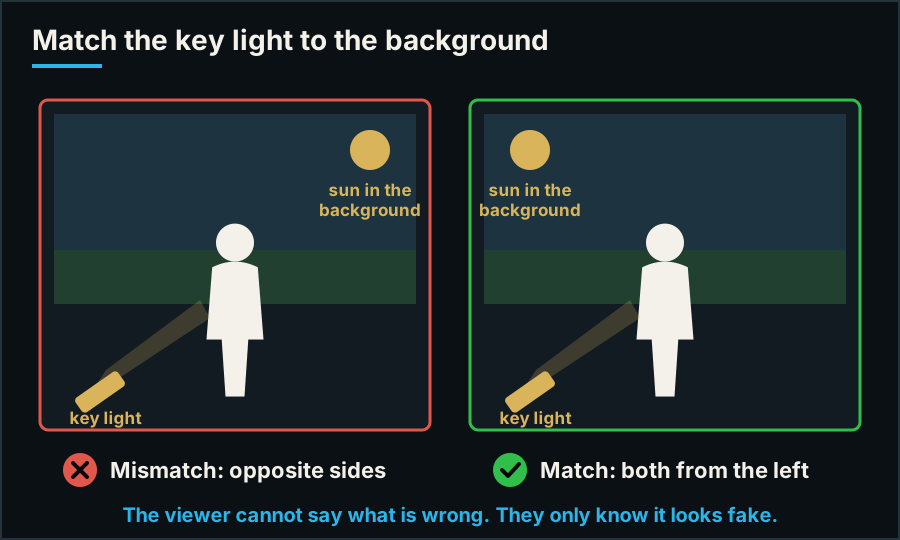
A perfect key cannot rescue light that comes from the wrong side.
So choose the background first, then match four things to it:
- Direction: the key light comes from the same side as the light in the background.
- Quality: hard sunlight outdoors, soft light in an overcast scene or an office.
- Color: a warm sunset background needs a warm key. A cool office needs a cooler one.
- Perspective: camera height and lens should agree with how the background was photographed. A background shot from eye level looks wrong behind a subject filmed from below.
On our shoots the backgrounds exist before the shoot day. Our own software, Studio Projects, generates them from the script, so the stage is lit to match an image that is already on the monitor.
8. Check the key on set, not the next day
Troubleshooting: what you see, and what caused it
| What you see in the key | Likely cause | Fix on set |
|---|---|---|
| Green rim on hair and shoulders | Spill: subject too close, or screen too bright | Move forward, dim the screen, add a back light |
| Patchy, flickering transparency | Uneven screen lighting or wrinkles | Even out the screen lights, stretch the fabric |
| Crawling, noisy edges | Screen underexposed, or high ISO | More light on the screen, lower ISO |
| Hands and arms turn see-through when moving | Motion blur | Faster shutter speed |
| A bright outline around the subject | In-camera sharpening | Turn sharpening off |
| Part of the clothing disappears | Wardrobe too close to the screen color | Change the outfit |
| Clean key, but it still looks fake | Light direction, color, or perspective mismatch | Relight to match the background |
9. Know when not to use green
Green screen is a tool, not a style. If the location is the point of the video, film the location. We have shot episodes in practical locations, with projected backdrops, and with a projector on one end of the room and green on the other, because each was the right answer for that script. A real workshop, a real lobby, or a real storefront carries a credibility that no virtual set has. Use green when the place does not exist, cannot be reached, or would cost more than the whole video to book.
The five-minute checklist
- Screen evenly lit, checked on a monitor, a little under the subject's exposure.
- Subject six to ten feet from the screen.
- Back light on, unused green covered, floor dealt with.
- No green, no fine patterns, nothing shiny. Second outfit on hand.
- Shutter fast enough for the movement, ISO low, exposure and white balance locked, sharpening off.
- Background chosen, and the key light agrees with it.
- Rough key checked on a monitor before the first take.
Common questions
Can I do this in my office?
For a head-and-shoulders shot, sometimes, if you can get six feet behind the subject and control the room's light. For anything wider, the space becomes the limit long before the equipment does.
Green or blue?
Green for almost everything: digital cameras capture it more cleanly and it needs less light. Blue when the subject is green, or has a lot of fine blonde hair that green tends to contaminate.
Is a virtual set cheaper than a location?
Often, once you count travel, permits, and the time lost moving a crew between rooms. One studio day can cover several "locations." It is not automatically cheaper for a single simple scene in a place you already own.
Want a second opinion on your next video?
If you are planning a green screen shoot, or trying to work out whether you need one at all, we are happy to look at the script and tell you honestly. We are a video production company in Grand Blanc, Michigan, with our own studio and a crew that works across the state and beyond. Tell us what you are planning and a producer will reply with real advice, whether or not you hire us. More guides like this one live under Education on our blog.